

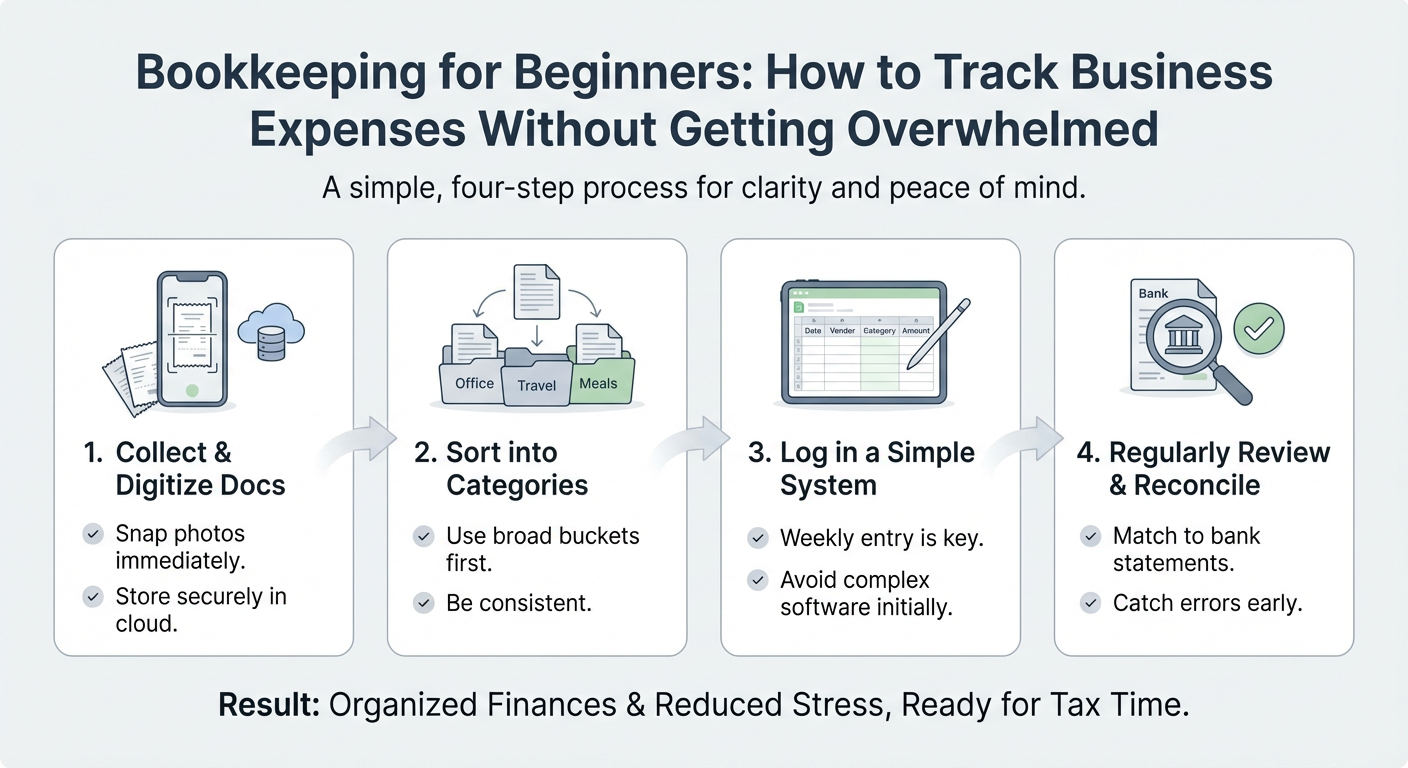
A shoebox of receipts isn’t a system. It’s a future headache. Expense tracking can be simple and still work, as long as you set up a repeatable workflow and actually use it.
This guide lays out a beginner-friendly way to track business expenses without turning bookkeeping into a second job.
Key takeaways
- Separate money first: business bank account plus business credit card.
- Pick one tracking method and stick with it (spreadsheet or software).
- Bookkeeping needs a weekly routine. “Catch up later” doesn’t happen.
- Save receipts in one searchable place and tie them to transactions.
- Use a short, repeatable category list. Don’t build a taxonomy.
- Review monthly to catch leaks, overspending, and missed deductions.
What counts as a business expense (and why tracking matters)
A business expense is generally ordinary and necessary for running your business. Tracking matters because it helps you:
- Claim legitimate deductions and lower taxable income
- Know your real profit (revenue without expenses is fantasy math)
- Make better decisions (pricing, hiring, software, marketing spend)
- Avoid year-end cleanup and missed deductions
Common expense categories include:
- Advertising/marketing
- Software and subscriptions
- Office supplies
- Travel and meals (often with special rules)
- Contractors and freelancers
- Rent and utilities (or home office, if applicable)
- Professional fees (accounting, legal)
- Education and training related to your work
Not sure if something qualifies? Track it anyway and ask a tax pro later. Beginners usually lose money by not tracking and having no paper trail.
Step 1: Separate business and personal money (the non-negotiable first move)
Mixed personal and business spending doubles the work. Separation is the fastest way to make bookkeeping manageable.
Do this as soon as you can:
- Open a business checking account
- Get a business credit card
- Use business accounts for business purchases only
If you’ve already mixed transactions, move on. Draw a line today and keep everything clean going forward.
Why this helps immediately
- Cleaner bank feeds with less sorting
- Easier tax prep
- More accurate financial reports
- Better documentation if you’re ever audited
Step 2: Choose a tracking system you’ll actually use
You don’t need the “best” system. You need the one you’ll keep up with. For most beginners, it comes down to:
- Spreadsheet-based tracking (cheap, manual)
- Accounting software (automated, subscription fee)
Spreadsheet vs. bookkeeping software (quick comparison)
| Option | Best for | Pros | Cons | Typical cost |
|---|---|---|---|---|
| Spreadsheet (Excel/Google Sheets) | Very small businesses with simple finances | Low cost, flexible | Manual entry, easy to fall behind, limited reporting | $0–$15/mo |
| Accounting software (e.g., QuickBooks, [Xero](https://www.xero.com/us/), [Wave](https://www.waveapps.com/)) | Most businesses with regular activity | Imports transactions, faster categorization, built-in reports | Monthly fees, setup learning curve | $0–$50+/mo |
| Receipt apps (e.g., [Dext](https://dext.com/us/business/bookkeeping-automation-platform), Expensify) | High receipt volume or travel-heavy work | Fast capture, searchable storage | Another tool to manage, costs add up | $5–$25+/user/mo |
Beginner recommendation:
If you have more than ~30 transactions a month or you run most spending through a card, accounting software usually saves time. If your business is tiny and predictable, a spreadsheet is fine, but only if you schedule time to update it.
Step 3: Set up your categories (keep it simple)
People get overwhelmed trying to create the perfect chart of accounts. Don’t. Start with 10–15 categories and expand only when you have a clear reason.
A simple starter list:
- Advertising & marketing
- Bank/merchant fees
- Contractors
- Insurance
- Internet & phone
- Meals (business)
- Office supplies
- Rent/co-working
- Software & subscriptions
- Travel
- Utilities
- Professional fees
- Equipment (large purchases)
- Taxes & licenses
- Miscellaneous (use sparingly)
Two rules that prevent messes:
1. Be consistent. Put the same kind of purchase in the same category every time.
2. Don’t nitpick. Splitting “Office supplies” into five micro-categories rarely changes decisions.
If you’re using accounting software, the default categories usually map to common tax lines. That’s plenty to start.
Step 4: Create a receipt capture routine you won’t hate
Receipts disappear fast and are painful to recreate later. Pick one place receipts live and one way you capture them. Then stop reinventing the process.
Good options:
- Receipt capture app (photo, auto-upload)
- Email rules/folders for digital receipts (e.g., a “Receipts” label)
- Cloud folder (Drive/Dropbox) organized by month
- Your accounting software’s receipt upload feature
Minimum viable receipt workflow
- Paper receipts: take a photo the same day
- Email receipts: forward to a dedicated inbox or save as PDF
- Name files consistently (example: `2026-03-OfficeDepot-42.18.pdf`)
Tip: Add a short note about the business purpose. “Client lunch, kickoff meeting” beats “restaurant” when you’re trying to remember six months later.
Step 5: Choose a schedule (daily is ideal, weekly is realistic)
Bookkeeping fails when it becomes a giant, occasional chore. Keep it small and regular.
A simple rhythm that works
Daily (2 minutes)
- Save receipts
- Tag unusual purchases so you remember what they were
Weekly (20–30 minutes)
- Import/review bank and card transactions
- Categorize everything new
- Match receipts to key transactions
- Flag unclear items for follow-up
Monthly (45–60 minutes)
- Reconcile accounts (transactions match statements)
- Review spending by category
- Audit subscriptions and recurring charges
- Set aside tax money (if applicable)
If you only do one thing, do the weekly session. That’s the difference between “under control” and “months behind.”
Step 6: Learn the few expense types that trip up beginners
Some transactions create confusion and messy books. Handle these cleanly and the rest is easier.
1) Owner draws, reimbursements, and personal spending
- Personal expense paid with business funds: record it as an owner draw/distribution (or owner personal), not a business expense.
- Business expense paid with personal funds: record it as an owner contribution or reimbursable expense, then reimburse yourself.
This keeps your reports honest and makes tax prep cleaner.
2) Meals, travel, and “mixed purpose” purchases
Meals and travel often need extra documentation. Even if you don’t remember the exact deduction rules, track:
- Date
- Amount
- Who it was with
- Business purpose
3) Big purchases (equipment) vs. regular expenses
A laptop, camera, or machine may be handled differently than supplies. Put large purchases in an Equipment category and keep the receipt. Your accountant can decide how to treat it later.
4) Subscriptions you forgot you had
Recurring charges quietly drain cash. During your monthly review, look for:
- Tools nobody uses
- Duplicate subscriptions
- Price increases
Cancel one unused tool and you may cover your bookkeeping software bill.
Step 7: Make expense tracking easier with a lightweight checklist
Use a checklist for your weekly session so you don’t waste time deciding what to do next.
Weekly bookkeeping checklist
- [ ] Download/import bank and card transactions
- [ ] Categorize all new transactions
- [ ] Add notes to unclear items (don’t guess and move on)
- [ ] Attach receipts for higher-value or audit-prone purchases (travel, meals, equipment)
- [ ] Flag follow-ups (refunds, duplicates, unknown charges)
- [ ] File receipts or confirm auto-upload worked
Put the checklist in your spreadsheet, accounting software notes, or a recurring calendar entry.
Step 8: Know what “good enough” looks like
You don’t need perfect books for them to be useful. Aim for:
- All transactions recorded
- Mostly correct categories
- Receipts saved and searchable
- Personal vs. business kept separate
- Monthly review done
Consistency beats perfection. Every time.
A simple workflow you can adopt today (in 15 minutes)
Starting from scratch? Do this now:
1. Create a Receipts folder in Drive/Dropbox with subfolders by month.
2. Create an email label/folder called Receipts.
3. Pick your tracking tool (spreadsheet or software).
4. Set up your 10–15 categories.
5. Schedule a weekly bookkeeping block (same day/time, 30 minutes).
6. Make one rule: save every receipt the same day.
Refine later. Get the habit in place first.
Conclusion: Keep it boring, keep it consistent
Expense tracking is mostly decision reduction. Separate accounts, use one tool, keep categories simple, store receipts in one place, and show up for the weekly session.
Next steps
- Choose your tracking method and set it up today
- Block 30 minutes each week for bookkeeping
- Do a monthly review and cancel one unnecessary recurring expense
When your books are steady, tax prep, cash flow planning, and pricing decisions get a lot easier.