


Managing business receipts is one of those tasks that feels minor until it becomes a crisis. A shoebox full of crumpled paper, a cluttered email inbox, or a frantic search before tax season are all signs that your current approach has room for improvement. The good news is that organizing receipts does not have to be complicated or particularly time-consuming.
This article walks you through practical, proven strategies to keep your business receipts organized throughout the year, so you can spend less time on paperwork and more time focused on your business.
Key Takeaways
- Capture receipts immediately, before they get lost or forgotten
- Use a consistent categorization system that aligns with your tax categories
- Choose between digital and physical storage based on your actual workflow
- Automate where it makes sense using apps and accounting software
- Review and reconcile receipts on a regular schedule, not just at tax time
Why Receipt Organization Actually Matters
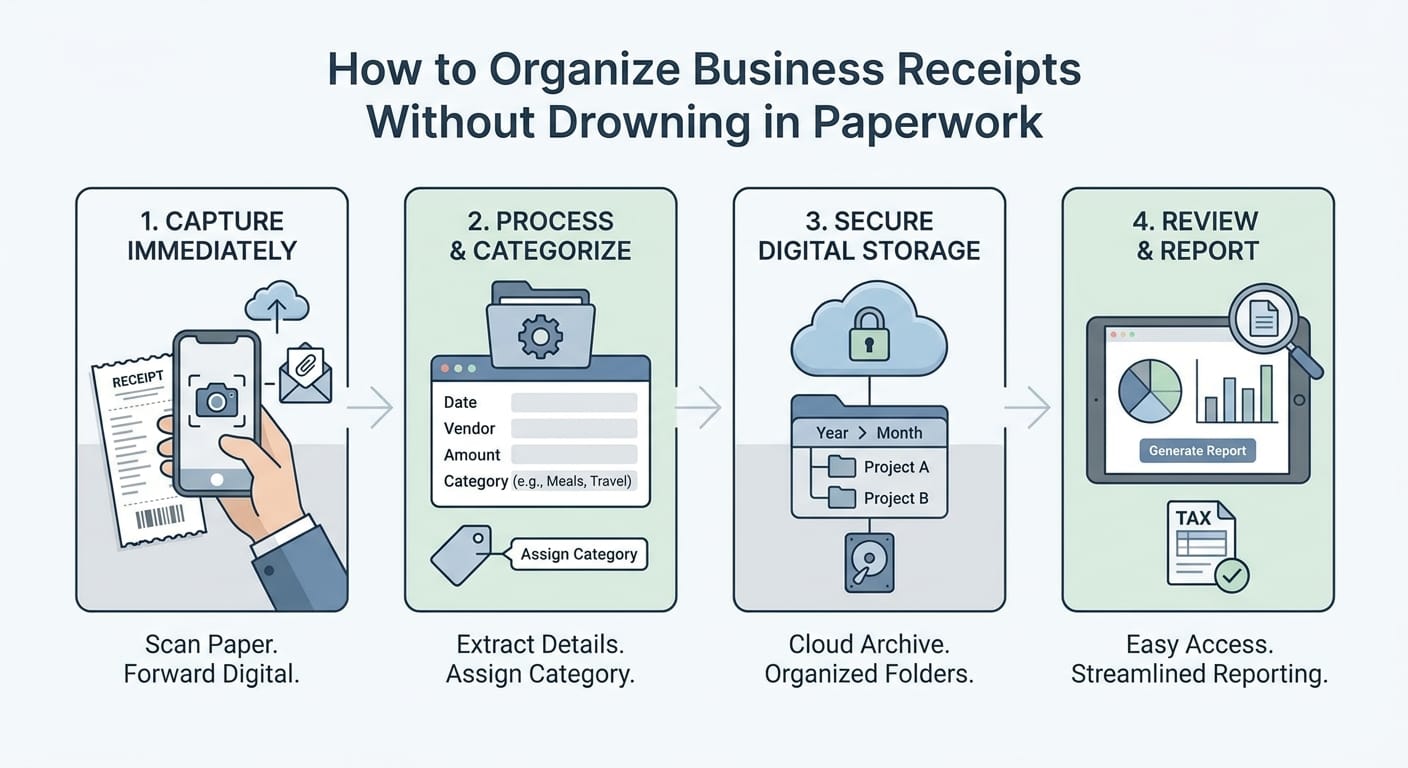
It is easy to treat receipt management as a low-priority administrative task. In practice, disorganized receipts can cost you real money and time.
Here is what is at stake:
- Missed deductions. If you cannot locate a receipt, you may not be able to support the expense claim. That can mean paying more in taxes than necessary.
- Audit exposure. The IRS requires businesses to maintain records that substantiate their deductions. Missing documentation can result in penalties.
- Cash flow blind spots. Without a clear record of spending, it becomes difficult to understand where your money is actually going.
- Wasted time. Reconstructing months of expenses before a tax deadline can take hours or days that could be spent elsewhere.
A straightforward, consistent system addresses all of these issues without requiring significant ongoing effort.
Step 1: Capture Receipts the Moment They Happen
The most common reason receipts go missing is delay. If you set something aside to deal with later, later has a way of not arriving.
Make capturing receipts a routine habit:
- Photograph paper receipts immediately after a purchase
- Forward email receipts to a dedicated business folder right away
- Use a receipt scanning app that uploads directly to cloud storage
- Keep a small envelope or folder in your bag for physical receipts that need processing later
The goal is straightforward: never let a receipt sit in limbo. Capture it now, file it when convenient, but do not let it disappear.
Step 2: Choose Your Storage System
You have two primary options for storing receipts: digital or physical. Most businesses today benefit from going fully digital, though some industries or workflows still call for physical backups.
| Factor | Digital Storage | Physical Storage |
|---|---|---|
| Space required | Minimal | Can become bulky over time |
| Search and retrieval | Fast with keyword search | Slow, requires manual sorting |
| Risk of loss | Low with cloud backup | Higher from fire, water, or misplacement |
| IRS acceptance | Yes, if legible | Yes |
| Setup effort | Moderate | Low |
| Ongoing maintenance | Low with automation | Moderate to high |
For most small business owners, digital storage is the more practical choice. Cloud-based systems are searchable, backed up automatically, and accessible from any device.
If you prefer to retain physical copies, use a filing cabinet with labeled folders organized by month and category. Maintaining digital backups alongside physical files is still advisable.
Step 3: Set Up a Category System That Works
Filing receipts without a logical structure is only marginally better than not filing them at all. You need a category system that reflects how your business operates and aligns with how expenses appear on your tax return.
Common business expense categories include:
- Travel and transportation
- Meals and entertainment
- Office supplies
- Software and subscriptions
- Marketing and advertising
- Professional services
- Equipment and technology
- Utilities
Confirm which categories apply to your specific situation with your accountant, then build your folder structure around those same labels, whether you are working digitally or physically.
A practical note: Using consistent category names across your receipt folders, accounting software, and spreadsheets reduces errors and saves time when reconciling accounts.
Step 4: Use the Right Tools
Receipt management does not need to be a manual process. Several tools are designed specifically to make this faster and more accurate.
Receipt scanning apps worth considering:
- Expensify works well for businesses with employees who submit expense reports
- Dext (formerly Receipt Bank) integrates with most accounting platforms and extracts data automatically
- Wave Receipts is free and suits freelancers or very small operations
- QuickBooks Online includes a built-in receipt capture feature for those already using it for accounting
- Receipts AI offers a straightforward way to extract and organize receipt data, which can be useful if you are looking for a focused tool without a steep learning curve
Accounting software with receipt management built in:
- QuickBooks Online
- FreshBooks
- Xero
- Zoho Books
Most of these tools can pull key details from a receipt photo, including vendor name, date, and amount, and suggest or apply expense categories automatically. That reduces manual data entry considerably.
Step 5: Build a Weekly or Monthly Review Habit
Even a well-designed system requires regular attention. Setting aside consistent time to review and reconcile receipts prevents small gaps from becoming larger problems.
A simple weekly routine might look like this:
1. Open your receipt app or storage folder
2. Confirm all receipts from the past week have been captured
3. Categorize any expenses that remain uncategorized
4. Match receipts to transactions in your bank or credit card statement
5. Flag any missing receipts and follow up promptly
A monthly review should include reconciling your accounts and verifying that expense categories are applied correctly.
Why this matters: Identifying discrepancies weekly is far less time-consuming than untangling several months of transactions before a filing deadline.
Step 6: Know How Long to Keep Receipts
Indefinite retention is unnecessary, but discarding records too early can create complications.
General retention guidelines:
- Keep most business receipts for at least 3 years, which corresponds to the standard IRS audit window
- Keep receipts related to property or significant assets for 7 years or longer
- Retain payroll records for at least 4 years
- Review your state's requirements, which may differ from federal guidelines
Labeling digital folders by year makes it straightforward to remove files once their retention period has passed.
Step 7: Separate Business and Personal Expenses
Mixing personal and business spending is one of the more common bookkeeping mistakes among small business owners. It complicates your records and can draw scrutiny during an audit.
Practical steps to keep expenses separate:
- Use a dedicated business bank account and credit card for all business purchases
- Avoid using your business card for personal expenses
- If expenses do get mixed, note it immediately and correct the entry in your accounting software
If you are a sole proprietor or freelancer who has not yet set up a separate business account, that is a worthwhile step to take sooner rather than later. It is one of the more impactful organizational changes you can make with relatively little effort.
Common Mistakes to Avoid
A few recurring habits tend to undermine otherwise solid systems.
- Waiting until tax season to organize receipts. This is typically the most costly mistake in terms of both time and stress.
- Storing receipts in multiple places without a central system. Settle on one approach and apply it consistently.
- Overlooking small receipts. Minor expenses accumulate, and they are often the easiest to misplace.
- Skipping digital backups. Cloud storage or an external drive provides straightforward protection for your records.
Conclusion: Start Simple and Build From There
A workable system does not need to be perfect from the start. Begin with the fundamentals: capture receipts promptly, store them in one consistent location, and review them on a regular schedule. As your business grows, you can layer in additional tools and automation to handle greater volume.
Practical next steps:
1. Choose a receipt storage method, digital or physical
2. Set up expense categories that correspond to your tax return
3. Download a receipt scanning app, such as Receipts AI or one of the other options listed above, and begin using it today
4. Block out a weekly 15-minute receipt review on your calendar
5. Open a dedicated business bank account if you have not already done so
Organized receipts translate to fewer headaches, more supportable deductions, and a considerably smoother tax season. The time you invest in building this habit now tends to pay back reliably every time you sit down to review your finances.